delta shower valve instructions
Installing a Delta shower valve can seem daunting, but with our guide, you’ll achieve a properly installed faucet that enhances your bathroom’s functionality and style.
Overview of Delta Shower Valves
Delta shower valves are designed to provide exceptional performance and durability, offering a wide range of styles and finishes to suit any bathroom decor. These valves are engineered with advanced technology, such as thermostatic temperature control and pressure-balancing features, ensuring a safe and enjoyable showering experience. Delta valves are known for their reliability and ease of use, making them a popular choice among homeowners and professionals alike. With various configurations, including single-handle and dual-handle options, Delta shower valves cater to diverse preferences and plumbing setups, delivering both functionality and aesthetic appeal.
Importance of Proper Installation
Proper installation of a Delta shower valve is crucial for ensuring optimal performance, safety, and longevity. Incorrect installation can lead to leaks, poor temperature control, and reduced durability, potentially causing water damage and safety hazards. It also voids the warranty and may result in higher maintenance costs. Correct installation ensures that features like thermostatic control and pressure balancing function correctly, providing a safe and enjoyable showering experience. Additionally, it prevents energy and water waste, enhancing overall efficiency. Proper installation is an investment in both functionality and property value, ensuring reliability and satisfaction for years to come.

Tools and Materials Needed
Installing a Delta shower valve requires essential tools like an adjustable wrench, screwdriver, and Teflon tape, along with materials such as plumbing lines and mounting hardware.
Essential Tools for Installation
Installing a Delta shower valve requires specific tools to ensure a smooth process. Start with an adjustable wrench for tightening and loosening connections. A screwdriver, both flathead and Phillips, will handle valve cartridge and handle installations. Pliers are useful for gripping small parts. Teflon tape is essential for creating watertight seals on threaded pipes. A bucket or container will catch water during disconnection. Towels or a drip pan will protect your floor from spills. Safety goggles are recommended to avoid eye injuries from debris. Having these tools ready ensures efficiency and prevents delays during installation.
Required Materials and Parts
For a successful Delta shower valve installation, gather all necessary materials and parts. The valve cartridge, mounting bracket, and plumbing connectors are essential. Ensure you have the shower handle, escutcheon, and any additional trim kits. Teflon tape is crucial for sealing threaded connections. Gaskets and O-rings prevent leaks. Check for included screws, clips, and adapters. If not provided, source them separately. Proper materials ensure a leak-free and functional installation. Having all parts ready avoids mid-installation delays and ensures a professional finish. Double-check the manufacturer’s list to confirm all components are accounted for before starting.

Preparing for Installation
Before installing your Delta shower valve, ensure the area is clear and protected. Gather tools and materials, shut off water supply, and disconnect the old faucet.
Shutting Off the Water Supply
Before starting the installation, locate the water shut-off valves, typically found near the water supply lines. Turn both the hot and cold water valves clockwise until they stop. Open the shower faucet to drain remaining water from the pipes. This step prevents water flow during installation, minimizing leaks and mess. Ensure the valves are completely closed to avoid any accidental water release. Once the water supply is off, you can safely proceed with disconnecting the old faucet and preparing for the new Delta shower valve installation.
Disconnecting the Old Faucet
To disconnect the old faucet, start by using an adjustable wrench or pliers to loosen and remove the water supply lines from the valve. Place a bucket or container underneath to catch any residual water. Next, disconnect the mounting screws that hold the old faucet in place. Gently pry the faucet away from the wall, taking care not to damage the surrounding area. Once removed, inspect the space to ensure it is clear of debris. This step ensures a clean and safe environment for installing the new Delta shower valve.
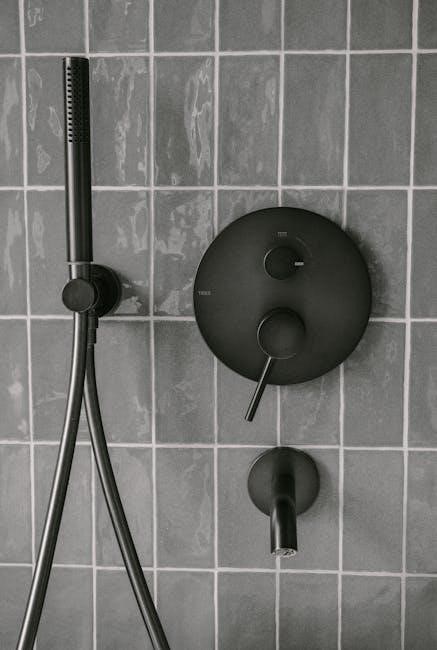
Installing the Delta Shower Valve
Mount the valve to the wall using the provided screws, ensuring it is level and secure. Connect the plumbing lines to the valve ports carefully, following the manufacturer’s guidelines for proper installation and alignment to avoid leaks and ensure optimal performance.
Mounting the Valve to the Wall
To mount the Delta shower valve, locate the wall studs for secure installation. Use the provided screws to fasten the valve to the wall, ensuring it is level. Apply a thin layer of plumber’s putty around the valve’s mounting flange to create a watertight seal. Tighten the screws firmly but avoid overtightening, which could damage the valve or surrounding area. Double-check the alignment and stability before proceeding to connect plumbing lines for a leak-free and durable installation.
Connecting Plumbing Lines
Connect the water supply lines to the Delta shower valve, ensuring they are properly secured with the provided adapters. Attach the hot and cold water lines to the corresponding ports on the valve. Use Teflon tape or pipe dope to create a watertight seal. Tighten all connections firmly but avoid over-tightening, which could damage the valve. Double-check that all plumbing lines are securely fastened and aligned correctly. Once connected, carefully turn the water supply back on and inspect for any leaks before proceeding with the installation.

Setting Up the Shower Handle
Install the shower handle by aligning it with the cartridge and securing it with the provided screws; Ensure it is tightly fastened for proper function.
Installing the Cartridge
To install the cartridge, align it with the valve housing, ensuring proper orientation.
Gently insert it into the valve, making sure it clicks securely into place.
Tighten the retaining ring or screw to hold the cartridge in position.
For single-handle cartridges, apply a small amount of plumber’s grease to the O-rings for smooth operation.
Double-handle cartridges may require aligning the temperature and volume controls before securing.
Always refer to the manufacturer’s guide for specific cartridge models.
Proper installation ensures leak-free performance and precise temperature control.
Adjusting the Temperature Limit
Adjusting the temperature limit on your Delta shower valve ensures safe water temperatures and prevents scalding.
Locate the temperature limit stop, typically found on the cartridge or valve stem.
Rotate the limit stop counterclockwise to increase the temperature or clockwise to decrease it.
Use an Allen wrench if required for this adjustment.
Test the water temperature after adjustment to ensure it meets your comfort level.
Be cautious not to set it too high to avoid burns, ideally below 120°F.
Refer to your Delta shower valve manual for specific instructions, as models may vary slightly.

Finalizing the Installation
Once all components are securely connected, turn the water supply back on and check for leaks. Test the valve to ensure smooth operation and proper water flow.
Attaching the Shower Handle
Attaching the shower handle is a straightforward process that requires attention to detail. Begin by aligning the handle with the cartridge stem, ensuring it fits securely. Use an Allen wrench to tighten the handle’s mounting screw, being careful not to overtighten. Once the handle is in place, test the temperature control by adjusting the limit stop to your desired setting. Finally, ensure all connections are secure and test the valve to confirm proper function.
Testing the Valve
After completing the installation, turn on the water supply and allow the system to pressurize. Check for leaks at all connections by inspecting the valve and plumbing lines. Test the valve by turning the shower handle to ensure smooth operation. Adjust the temperature limit stop to verify proper temperature control. Run water through the showerhead to confirm water flow and pressure. If everything functions correctly, your Delta shower valve is successfully installed and ready for use.

Troubleshooting Common Issues
Troubleshooting your Delta shower valve is essential for maintaining optimal performance. Identify common issues like leaks or temperature malfunctions early to prevent further damage. Swift action ensures longevity and reliability, keeping your bathroom functioning smoothly.
Addressing Leaks
Leaks in a Delta shower valve can be resolved by inspecting and tightening connections. Start by turning off the water supply to avoid further damage. Check the valve’s O-rings and gaskets for wear or cracks. Replace any damaged parts with genuine Delta replacements. Apply a small amount of plumber’s grease to ensure a watertight seal. If leaks persist, consider disassembling the valve to check for internal damage. Always refer to the manufacturer’s guidelines for specific instructions, ensuring a proper and lasting fix to maintain your shower’s performance and prevent water waste.
Fixing Temperature Malfunctions
Temperature malfunctions in Delta shower valves often stem from issues with the temperature limit stop or the cartridge. Start by ensuring the limit stop is properly adjusted. If water temperature fluctuates, inspect the cartridge for mineral buildup or damage. Clean or replace the cartridge as needed. Always turn off the water supply before attempting repairs. If the problem persists, consult the manufacturer’s instructions for resetting the temperature settings. Regular maintenance, such as cleaning the valve, can prevent such issues. Addressing temperature malfunctions promptly ensures safe and consistent water temperatures, enhancing your showering experience and preventing scalding risks.

Maintenance and Care
Regularly clean the Delta shower valve to prevent mineral buildup and ensure smooth operation. Inspect and replace worn-out parts promptly to maintain optimal performance and longevity.
Cleaning the Valve
Cleaning the Delta shower valve is essential for maintaining its performance. Start by turning off the water supply to prevent any leaks during the process. Use a soft cloth or sponge to wipe down the exterior, removing any soap scum or mineral deposits; For the handle and cartridge, gently scrub with a mild detergent and warm water. Avoid harsh chemicals or abrasive materials that could damage the finish. Rinse thoroughly and dry with a clean towel to prevent water spots. Regular cleaning ensures the valve operates smoothly and lasts longer.
Replacing Worn-Out Parts
Replacing worn-out parts on a Delta shower valve is crucial for maintaining its functionality and preventing leaks. Begin by identifying the specific parts that need replacement, such as the cartridge, O-rings, or gaskets. Turn off the water supply and drain the system to ensure safety. Carefully disassemble the valve, removing the handle and any retaining clips or screws; Extract the old cartridge and inspect the area for mineral buildup or debris, cleaning it with a soft brush or cloth. Install the new cartridge, applying plumber’s grease to new O-rings for a watertight seal. Reassemble the valve, ensuring all parts are securely fastened. Finally, turn the water supply back on and test for leaks to confirm the repair.
By following these detailed instructions, you’ve successfully installed, maintained, and repaired your Delta shower valve. Proper installation enhances your bathroom’s functionality and aesthetic appeal, while regular maintenance ensures long-lasting performance. Remember to address any issues promptly to prevent further damage. With these steps, you’ve not only saved money but also gained confidence in handling plumbing tasks. Enjoy your upgraded shower experience, knowing your Delta valve is durable and reliable. Troubleshooting common issues ensures optimal functionality, making your bathroom a haven of comfort and style.
Leave a Reply
You must be logged in to post a comment.